Seria correto falar que tem uma nova Engine da Scirra?
Eu diria que a nova contruct, nada mais é que a versão 2, um pouco turbinada.
Isso quer dizer que se você ja usou a versão 2 da engine, não terá qualquer problema com sua nova versão
Tudo esta la, o controle por camadas, os behaviors por objetos, assim como o controle de comportamentos na aba do motor de jogos.
O Contruct sempre foi simples de ser usado, e tudo isso continua lá.
Agora contudo novos recursos estão disponíveis, você tem a possibilidade de exportar para mobile, bem como vários formatos diferentes, isso da uma nova vida ao motor.
Outro fato curioso, e que a plataforma é 100% online, tendo assim uma portabilidade fantástica, uma vez que ele usar o drive como forma de armazenamento de informações.
Infelizmente, nem tudo são flores, a engine trás consigo, alguns bugs de importação e outros erros de compilação, e como não possui um save state direto, acaba por as vezes te fazendo perder algo, ou desfazer algo. Contudo ela continua sendo uma engine muito amigável e muito poderosa, para seus jogos em 2D.
Link para um jogo na engine:
https://rodolfogentil.itch.io/breakout-construct
sábado, 3 de junho de 2017
Construct 3 By Cesar Peixoto
O artigo abaixo tem como função estritamente acadêmica, foi elaborado com o proposito de resolucionar a atividade proposta pelo professor Luiz Menezes da faculdade PUC Campinas, na disciplina de jogos digitais.
Talvez o titulo da postagem esteja incorreto. A proposta em conhecer o novo motor Construct 3, chega a ser quase uma piada.
Pois, em tese tudo que se vê na versão 3 da engine, se via na versão 2. Logico, isso quando tratamos a forma como a Engine funciona.
A versão 2 da contruct sempre teve um caráter muito voltado para o 2D, sendo uma engine simples e intuitiva.
E tudo isso se vê na versão 3 da engine. É como se ao fundo apenas mudasse o nome da engine em seu corpo.
Mas então por que mostrar essa nova engine? Por que continuar nela?
A versão 3 da contruct tem algumas coisas que vieram como um respiro para sua versao anterior.
Agora ela e uma engine 100% online, onde tudo que você precisa para trabalhar e de um computador com acesso a rede. Ate por que você pode usar a cloud e seu drive para armazenar tudo aquilo que foi importado ou usado dentro do projeto. Alem de rodar o jogo direto do navegador.
A engine continua a mesma, você trabalha com camadas, cada asset pode ter suas configurações de comportamentos(Behavior), a forma de inclusão ainda se divide nas 3 abas, a de controles comenda e a cena de jogo.
Se em algum momento você trabalhou com a contruct 2, vera que a 3 não teve qualquer mudança em sua interface.
Porem, outro ponto relevante, esta na publicação. Você pode publicar jogos diretamente do navegador desde formatos mobile, como os já tradicionais formatos utilizados.
A contruct, traz na sua versão 3, uma plataforma enxuta e ideal para quem quer fazer simples jogos em 2D, ate por que toda facilidade e acessibilidade da Engine te ajuda a construir melhores ideias.
Acredito que ela some algo novo a ser pensado por todas engines, pois a interação em rede, transforma o trabalho com a engine, de forma muito mais amistosa.
Por fim, a Scirra pode se gabar, de ter construído um bom motor de jogos. Extremamente simples, mas que entrega seu resultado.
Abaixo segue um link de um jogo feito na contruct 3:
https://rodolfogentil.itch.io/panda-breakout
quarta-feira, 3 de maio de 2017
Introducing Unreal Engine
Conhecendo o Unreal Engine
Este artigo, faz parte de uma série de artigos acadêmicos, em função da atividade proposta pelo professor Luiz Junior, do curso de desenvolvimento de jogos digitais, da Pontifícia Universidade Católica - PUC - Campinas-SP-Brasil.
A atividade consiste na reconstrução do clássico jogo digital Breakout, em diferentes motores, publicando a experiência em foros especializados, e disponibilizando os fontes dos projetos.
Organização do Projeto
A princípio, a organização do projeto funciona semelhante a outros motores, como a Unity 3D, que segue aquela hierarquia de pastas, comum e todos os sistemas operacionais, além de sistema de pesquisa e filtros. Porém, o Editor da Unreal oferece alguns detalhes a mais. Os assets possuem ícones próprios, além de um sistema de classificação por cores. O editor inclusive permite que você customize as cores das pastas. Pode parecer um mero capricho, mas é incrível como isso agiliza e facilita a localização dos assets do seu projeto.

Outro ponto que chama muita atenção são as opções de customização do editor e do projeto, recheada de sutilezas para tornar a vida de qualquer desenvolvedor muito mais fácil. Permite uma customização muito ampla e precisa das ferramentas, bem como funções de conveniência, como por exemplo, o auto save do projeto, além de caprichos, como automatização de textos de copyright nos headers de seus arquivos .h.

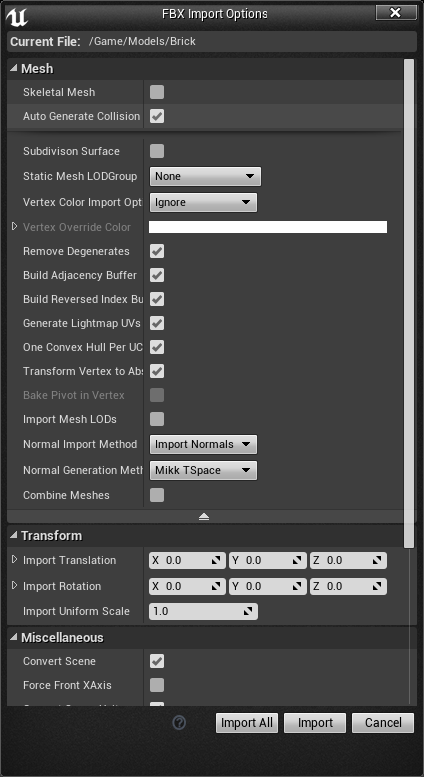
Importando Malhas
Importar os modelos 3D para o editor é uma tarefa bastante confortável, pois o editor dispõe de opções avançadas, como combinar malhas, geração automática de LODs e colisores, alteração dos atributos de transformações, como rotação e escala, além de permitir a correção dos eixos e normais de acordo com o padrão do motor.

Mas a conveniência não termina por aí, o editor ainda oferece ferramentas para tratar a malha, permitindo opções como manipular os vértices, normais, UV, além de customizar colisores, dentre muitas outras. Desta forma, muitos ajustes e correções podem ser realizados no próprio editor, evitando a necessidade de retornar asstes para que o artista 3D faça pequenos ajustes.
Level Design
Muitos atalhos para snap são ótimos, em especial, a tecla “End” que desce a malha até colidir com alguma superfície, permitindo encaixes precisos, se temer que o objeto esteja dentro da superfície. Outro atalho muito útil é a tecla Shift. Ao segurá-la enquanto faz a translação de qualquer objeto, a câmera do editor acompanha o movimento, mantendo o ângulo de visão enquanto você movimenta a malha, procurando o melhor encaixe. Ao segurar a tecla Ctrl e fazer uma translação, o objeto é automaticamente clonado.
Porém, quando foi escalar os objetos, senti muita falta da ferramenta Rect Transform da Transform Tools do Unity Editor. Às vezes você quer aumentar ou reduzir apenas um dos lados, e a Unreal não apresentou (ou eu realmente não encontrei) nenhuma ferramenta similar, de fácil alcance na interface.
Outro ponto que vale ser comentado é quanto a configuração do movimento snap com diferentes escalas. A Unreal deixa o acesso fácil e conveniente, com valores padrão. Entretanto, a Unity permite que você personalize os valores com precisão, o que facilita mais o trabalho no level design.
A última ferramenta que achei muito útil no level design, e que a Unity não oferece nada similar, é o controle de velocidade da câmera. Ao navegar pelo mapa, você pode controlar a velocidade desta navegação, utilizando a roda do mouse. Desta forma, você pode fazer movimentos lentos e precisos ao analisar um espaço pequeno, e com um simples movimento de dedo, alterar a velocidade para chegar ao outro lado do mapa rapidamente.
Assim como no Unity, você pode incluir geometrias primitivas em seu projeto, através das ferramentas de Brush. É uma ferramenta poderosa que permite a modelagem das primitivas, porém a um custo muito elevado. A nossa simples esfera do jogo, possui mais de 800 triângulos.
Por outro lado, o editor permite que seja feita a redução de polígonos, trabalhando de forma similar às conhecidas ferramentas de mercado. Em uma avaliação tão superficial, é difícil mensurar o quão bom ou ruim é trabalhar com as primitivas na Unreal, mas a primeira impressão, é que, ao contrário da Unity, estas primitivas devem ser usadas com cuidado e moderação na Unreal.

Usando o C++
A utilização do C++ para programação dos scripts pode ser um fator que assusta desenvolvedores que não tem experiência com a linguagem, e não é pra menos. Logo nos primeiros passos, ao errar a sintaxe de um parâmetro de macro, o Visual Studio apontou 150 erros de compilação em um código de 15 linhas. Pensando nisso, a Epic anexou ao editor, um console, que interpreta os erros de compilação no framework, exibindo mensagens mais exatas. Ainda não é uma solução perfeita, mas é de grande ajuda. Porém, para utilização, a compilação deve ser feita pelo editor.

O Unreal Framework oferece um sistema de Garbage Collector para as UClass. Você pode alocar memória manualmente, você pode fazer uso de smart pointers (tanto do padrão da linguagem, como do próprio framework), e você pode fazer uso do garbage collector, que, segundo a equipe de engenheiro da Epic, é uma solução bastante otimizada, livre bugs, e totalmente configurável através do editor. Este também é um ponto bastante positivo, não só para programadores sem experiência com alocação de memória, mas também para programadores experientes, pois gerenciar a memória em uma cadeia tão grande de objetos com infinitas dependências, seria uma tarefa colossal.
A parte mais difícil na adaptação são as novas possibilidades abertas pelo Unreal Framwork. O interpretador de scripts da Unity, com utilização da linguagem C#, permite a programação multiparadigma (programação orientada a objetos, programação genérica, programação funcional, etc.) na implementação dos seus componentes, porém, o paradigma do projeto é orientado a componentes. Você não consegue implementar diretamente um GameObject, todo o comportamento é ditado por Componentes que determinam o comportamento. (https://docs.unrealengine.com/latest/INT/API/QuickStart/index.html)
Com o Unreal Framework, o projeto é orientado a objetos, e o C++ permite a programação multiparadigma, o que proporciona uma visão é totalmente diferente. Além das classes primitivas C++, que podem ser livremente utilizadas, o framework oferece uma enorme gama de classes que você pode herdar. Por uma questão de brevidade, vamos ficar com as três principais. Actor é classe base para criar objetos na cena, (a classe mais primitiva é UObject, porém, esta classe não permite integração com o mapa.). Fazendo uma grosseira analogia, ao derivar de Actor, é como se você derivasse da classe GameObject da Unity.
Pode não parecer grande coisa, mas isso faz uma enorme diferença no raciocínio que se deve ter para estruturar o seu projeto. Você pode comportamentos em suas classes Actor, derivar delas para especificar estes comportamentos, e potencializar tudo com a utilização dos componentes, o que te leva a um outro universo de possibilidades para planejamento e manutenção do projeto. Um exemplo, que foi a primeira mudança substancial que reparei, quanto a forma de planejar, é por utilizar construtores. Quem já teve experiência com na programação de comportamentos mais elaborados na Unity, sabe a frustração de não poder garantir coisas no tempo da instanciação dos objetos. O callback Awake não garante isso, gerando diversos problemas de sincronia. Na Unreal, você utiliza o construtor da classe, garantindo o comportamento adequado quando o objeto for instanciado.
Retornando a análise das três principais classes do Unreal FrameWork, Actor seria uma classe, a princípio, para objetos inanimados. Pawn (deriva de Actor oferecendo mais funcionalidades), por sua vez, seria para objetos animados e inteligência artificial, e a classe Character (deriva de Pawn oferecendo mais funcionalidades), como o próprio nome sugere, seria para construção de personagens, oferecendo uma poderosa gama de recursos como Skeleton, entre outros.
Sempre lembrando que, em conjunto com as classes, você também utiliza componentes, porém, utilizar componentes na Unreal é uma experiência totalmente diferente da Unity. Ao criar um componente na Unity, você deriva, via de regra, de MonoBehaviour, e através dele, você manipula outros componentes padrão, anexados ao GameObject. Por exemplo, no seu script, você busca referências de componentes de colisores, de física, animação, etc., para trabalhar os comportamentos. No Unreal, você pode fazer isso, e também pode derivar o seu componente de qualquer outro fornecido pelo framework, e customizar de forma diretamente. Você não está preso ao MonoBehaviour. Imagine se você pudesse derivar diretamente o componente Rigidbody e alterar o comportamento da física diretamente. O Unreal Framework possibilita isso.
A liberdade é imensa, o poder é tremendo, mas nem tudo é fácil. A classe Actor é tão básica, que você precisa anexar um componente de ligação com a cena (RootComponent), na Unity, todo GameObject já contém um componente transform por padrão. Você pode anexar qualquer componente ao slot RootComponet, mas, pelos tutorias que li para elaborar este projeto, existe uma preferência por anexar os componentes de colisão como root. (https://docs.unrealengine.com/latest/INT/Programming/Tutorials/Components/1/)
Entender este conceito não foi uma experiência muito fácil de ser assimilada. Não pela dificuldade de entendimento, mas pela falta de informação. A documentação oferece uma quantidade razoável de tutoriais e guias de inicialização rápida, porém, peca muito na apresentação de conceitos fundamentais. É claro que utilizar outro motor, é sair de sua zona de conforto, mas, foi muito frustrante errar constantemente coisas fundamentais, e não encontrar com facilidade a informação necessária para amparar e assimilar tais conceitos. Neste quesito, a documentação deixa a desejar.
Mas os problemas não pararam por aí. A Unreal tem uma classe denominada GameMode, que é uma espécie de manager do jogo / level. Não saber da sua existência é um problema sério, pois a engine cria na cena um player padrão, assumindo câmera e input. É uma solução bastante prática para explorar os leveis em desenvolvimento, sem que a programação personagem não esteja pronta. O problema é que você não é avisado sobre isso, o default da Unreal se sobrepõe aos controles que você está programando e, até você entender o que está acontecendo, e descobrir como tomar o controle para si, configurando o GameMode, você fica perdido, procurando um erro sem qualquer feedback.
E por falar em experiências frustrantes, encontrar como programar o comportamento de colisão (destruir o brick quando tiver contato com a bola) foi simplesmente uma tortura. Depois de bastante pesquisa, hoje ficou um pouco mais claro, mas durante a elaboração do projeto para este artigo, conseguir registrar o callback responsável pelo comportamento quando houvesse uma colisão, foi uma combinação de sentimentos negativos, como tristeza, raiva e frustração abundante. Em determinados momentos você se sente como um completo boçal.
Definitivamente, fazer um jogo, mesmo que simples, na Unreal, em C++, como sua primeira experiência com o motor, não é algo que se recomenda fazer em um final de semana, como no caso do projeto para este artigo. Depois de finalizado o projeto, garantindo a questão acadêmica, e estudando o motor com um pouco mais de calma, você vai se adaptando e pegando o jeito.
Outro ponto interessante, é que, mesmo sem uma documentação consistente, você pode navegar pelo projeto, verificar a implementação das funções no motor, e, principalmente, examinar o código de tudo que a Epic lhe oferece por padrão, o que, sem qualquer dúvida, é uma rica experiência.
Sem dúvida alguma, é um motor extremamente versátil, muito poderoso, mas que demanda algum estudo antes de partir para prática, principalmente se você já iniciar com C++, que lhe obriga a fazer todos os pequenos ajustes que o Blueprint lhe entrega como padrão.
Este artigo é de autoria de César da Silva Peixoto e Rodolfo Gentil.
link para o jogo:
https://rodolfogentil.itch.io/udk-breakout
https://rodolfogentil.itch.io/udk-breakout
Knowing Unreal Engine
This article is part of a series of academic articles, based on the activity proposed by Professor Luiz Junior, of the course development of digital games, in Pontifical Catholic University - PUC - Campinas-SP-Brazil.
The activity consists of the reconstruction of the classic digital game Breakout, in different engines, publishing the experience in specialized forums, and making available the sources of the projects.
Project Organization
At first, the project organization works similar to other engines, such as Unity 3D, which follows that hierarchy of folders, common and all operating systems, as well as search system and filters. However, the Unreal Editor offers some more details. The assets have their own icons, as well as a color classification system. The editor also allows you to customize the folder colors. It may seem like a whim, but it's amazing how it speeds up and makes it easier to find the assets of your project.
Another point that draws a lot of attention is the editor and project customization options, packed with subtleties to make any developer's life much easier. It allows for a very wide and precise customization of the tools, as well as convenience functions, such as the project auto save, as well as whims, such as automating copyright texts in the headers of your .h files.
Importing Mesh
Importing 3D models into the editor is a very comfortable task because the editor has advanced options such as combining meshes, automatic generation of LODs and collisors, change of transformation attributes such as rotation and scaling, as well as the correction of the axes And normal according to the motor standards.
But the convenience does not end there, the editor still offers tools to handle the mesh, allowing options such as handle vertices, normal, UV, and customize colliders, among many others. In this way, many adjustments and corrections can be made in the editor itself, avoiding the need to return them so that the 3D artist makes minor adjustments.
Level Design
Many snap shortcuts are great, especially the "End" key that lowers the mesh until it collides with some surface, allowing precise snaps if you fear the object is inside the surface. Another very useful shortcut is the Shift key. While holding it while translating any object, the editor's camera tracks the movement, maintaining the viewing angle as you move the mesh, looking for the best fit. By holding down the Ctrl key and doing a translation, the object is automatically cloned.
However, when I scaled the objects, I missed the Transform Tools Rect Transform tool from Unity Editor. Sometimes you want to increase or reduce only one side, and Unreal has not presented (or I have not really found) any similar, easy-to-reach interface tool.
Another point worth mentioning is the configuration of snap movement with different scales. Unreal makes access easy and convenient, with default values. However, Unity allows you to tailor the values accurately, making it easier to work on level design.
The last tool I found very useful in level design, and that Unity offers nothing similar, is the speed control of the camera. When navigating the map, you can control the speed of this navigation by using the mouse wheel. In this way, you can make slow and precise movements when analyzing a small space, and with a simple finger movement, change the speed to reach the other side of the map quickly.
Just like in Unity, you can include primitive geometries in your design, using Brush tools. It is a powerful tool that allows the modeling of primitives, but at a very high cost. Our simple sphere of the game, has more than 800 triangles.
On the other hand, the editor allows the reduction of polygons, working in a similar way to the known market tools. In such a shallow assessment, it is hard to measure how good or bad it is to work with the primitives in Unreal, but the first impression is that, unlike Unity, these primitives should be used with care and moderation in Unreal.
Using C ++
The use of C ++ for programming scripts can be a factor that scares developers who have no experience with the language, and not for less. In the first few steps, when you miss the syntax of a macro parameter, Visual Studio pointed out 150 compilation errors in a 15-line code. Thinking about it, Epic appended to the editor, a console, which interprets the compilation errors in the framework, displaying more accurate messages. It is still not a perfect solution, but it is a great help. However, for use, compilation must be done by the publisher.
Unreal Framework offers a Garbage Collector system for UClass. You can allocate memory manually, you can make use of smart pointers (both the language standard and the framework itself), and you can make use of the garbage collector, which according to Epic's engineering team is a very optimized solution , Free bugs, and fully configurable through the editor. This is also a very positive point, not only for programmers with no memory allocation experience, but also for experienced programmers, because managing memory in such a large chain of objects with infinite dependencies would be a daunting task.
The most difficult part in the adaptation is the new possibilities opened by Unreal Framwork. The Unity script interpreter, using the C # language, allows multiparadigma programming (object-oriented programming, generic programming, functional programming, etc.) in the implementation of its components, but the project paradigm is component-oriented. You can not directly implement a GameObject, all behavior is dictated by Components that determine the behavior.
(Https://docs.unrealengine.com/latest/INT/API/QuickStart/index.html)
With Unreal Framework, the project is object oriented, and C ++ allows multiparadigma programming, which provides a totally different view. In addition to the C ++ primitive classes, which can be freely used, the framework offers a huge range of classes that you can inherit. For the sake of brevity, let's stick with the top three. Actor is base class for creating objects in the scene, (the most primitive class is UObject, however, this class does not allow integration with the map.) By making a crude analogy, by deriving from Actor, it is as if you derived from the Unity GameObject class.
It may not seem like a big deal, but it makes a huge difference in the thinking you have to structure your project. You can behaviors in your Actor classes, derive from them to specify these behaviors, and potentiate everything with the use of components, which leads you to another universe of possibilities for planning and maintaining the project. An example, which was the first substantial change I noticed, how to plan, is to use builders. Anyone who has had experience with more elaborate behavior programming at Unity knows the frustration of not being able to guarantee things at the time of instantiation of objects. The Awake callback does not guarantee this, causing several synchronization problems. In Unreal, you use the class constructor, ensuring proper behavior when the object is instantiated.
Returning to the analysis of the three main classes of Unreal FrameWork, Actor would be a class, in principle, for inanimate objects. Pawn (derived from Actor offering more features), in turn, would be for animated objects and artificial intelligence, and the Character class (derived from Pawn offering more features), as its name suggests, would be for character building, offering a powerful Range of features like Skeleton, among others.
(Https://docs.unrealengine.com/latest/INT/API/Runtime/Engine/GameFramework/ACharacter/index.html)
Always remembering that, in conjunction with classes, you also use components, however, using components in Unreal is a totally different experience from Unity. When you create a component in Unity, you are usually derived from MonoBehaviour, and through it, you manipulate other standard components, attached to the GameObject. For example, in your script, you look up references to collider components, physics, animation, etc. to work on the behaviors. In Unreal, you can do this, and you can also derive your component from any other provided by the framework, and customize it directly. You are not stuck with MonoBehaviour. Imagine if you could directly derive the Rigidbody component and change the behavior of physics directly. The Unreal Framework makes this possible.
Freedom is immense, power is tremendous, but not everything is easy. The Actor class is so basic that you need to attach a link component to the scene (RootComponent) in Unity, every GameObject already contains a transform component by default. You can attach any component to the RootComponet slot, but from the tutorials I read to work on this project, there is a preference for attaching the collision components as root.
(Https://docs.unrealengine.com/latest/INT/Programming/Tutorials/Components/1/)
(Https://docs.unrealengine.com/latest/INT/Programming/Tutorials/Components/1/)
Understanding this concept was not a very easy experience to assimilate. Not by the difficulty of understanding, but by the lack of information. The documentation offers a reasonable amount of tutorials and quick startup guides, however, it sins very much in the presentation of fundamental concepts. Of course using another engine is getting out of your comfort zone, but it has been very frustrating to constantly miss out on fundamental things, and not easily find the information needed to support and assimilate such concepts. In this regard, the documentation is unsatisfactory.
But the problems did not stop there. Unreal has a class called GameMode, which is a kind of game manager / level. Not knowing its existence is a serious problem, because the engine creates in the scene a standard player, assuming camera and input. It's a very handy solution to explore the developing levels without the character programming being done. The problem is that you are not warned about it, the Unreal default overrides the controls you are programming and until you understand what is happening and figure out how to take control of yourself by configuring GameMode, you get lost, Looking for an error without any feedback.
And speaking of frustrating experiences, finding how to program collision behavior (destroying the brick when it comes into contact with the ball) was simply torture. After a lot of research, it got a little clearer today, but during the drafting of the project for this article, being able to record the callback responsible for behavior when there was a collision was a combination of negative feelings, such as sadness, anger and abundant frustration. At certain times you feel like a complete boqual.
Definitely making a game, even simple, in Unreal, in C ++, as your first experience with the engine, is not something that is recommended to do on a weekend, as in the case of the project for this article. After finishing the project, ensuring the academic issue, and studying the engine with a little more calm, you will adapt and get the hang of it.
Another interesting point is that, even without a consistent documentation, you can navigate through the project, check the implementation of the functions in the engine, and especially examine the code of everything that Epic offers you by default, which without any doubt , Is a rich experience.
Undoubtedly, it is an extremely versatile engine, very powerful, but it requires some study before starting to practice, especially if you already start with C ++, which forces you to make all the small adjustments that Blueprint gives you as default.
This article was written by César da Silva Peixoto and Rodolfo Gentil
link for game download:
https://rodolfogentil.itch.io/udk-breakout
segunda-feira, 17 de abril de 2017
Introducing Duality Engine
This article is part of a series of academic articles, based on the activity proposed by Professor Luiz Junior, on classes of development of digital games,
from Pontifical Catholic University - PUC - Campinas-SP-Brazil
from Pontifical Catholic University - PUC - Campinas-SP-Brazil
The activity consists of the reconstruction of the classic digital game Breakout,
in different engines, publishing the experience in specialized forums, and made
available the source of the projects
The scope of this first article is an analysis of first impressions of Duality
Engine use for the production of 2D digital games.


 Duality Engine is a 2D open source game development framework that offers a
visual editor and component-oriented development using scripts with support for
the C # programming language hosted on http://duality.adamslair.net/


There is no official documentation for consultation, however, the source code is
open (https://github.com/AdamsLair/duality/), the community around the project is
quite active (http://forum.adamslair.net/),
It also offers tutorials that present
the fundamental resources to mark learning

(https://github.com/AdamsLair/duality/wiki/Getting-Started).


Because it is an open source engine, created largely by a single developer, it is
amazing how much functionality is available in the editor, and how it all works
very well.


A simple and clean graphical user interface, you can easily find all the features
offered.


Images taken from the official website (http://duality.adamslair.net/).
Following the guidance of the official tutorials, in a few hours you are already familiar with the editor, easily finding your assets, such as importing assets, editing scenarios, colliding, etc. But not everything is flowers, especially the level navigation system, is different from all the editors I've had experience so far, generating a combination of frustration and irritation at certain times.
The scripting system is integrated with visual studio, which is automatically activated when the button is pressed.
 Images taken from the official website (https://github.com/AdamsLair/duality/wiki/Getting-Started).
The use of scripts is easy and intuitive, based on the C # programming language, following the systematic pattern of large commercial engines, with Unity.

Images taken from the official website (https://github.com/AdamsLair/duality/wiki/Getting-Started).
Using interfaces to integrate component behaviors makes learning easy and intuitive. Just like in the Unreal Engine, it is necessary to build each time the scripts are changed. For those who are used to Unity, this may create some confusion, but it is easily overcome. The experience of rebuilding the Breakout game in this framework was quite entertaining.
Except for the frustration of navigating the scenery (something I have not yet overcome), the editor's features greatly streamlines the creation process. In addition, scripts in an intuitive language like C #, make the experience extremely easy. Considering the simple nature of Engine, the result was amazing! It is highly recommended for 2D projects and for learning to create digital games.
Assets used in the project are free, and have been taken from a tutorial for Contruct 2, (will be the subject of another article), and are on the website
https://www.scirra.com/tutorials/313/cloning-the- Classics-breakout-video / page-1.
The project and source code have been published in itchio at
https://rodolfogentil.itch.io/duality-breakout.
The download is free.
The download is free.
This article is written by César da Silva Peixoto and Rodolfo Gentil.
Assinar:
Comentários (Atom)